
How To Needle Felt a Dog
Subtitled: There Will Be Blood. (Yes, you will stab yourself, at least the first 1 or 2 times you try felting.)Wee Background
I come from a family of crafty folks. When my sis and I first saw Domenica More Gordon's dogs on TV, we knew we had to find out how she made those adorable dogs. (...since we couldn't afford the £500+ price tag!) That's how we discovered "needle felting."
Since our dogs are not as fine-tuned as Domenica's, we like to call them "caricatures" and we've custom made many pups over the last couple of years.
 |
| My sister's Husky-mix and my bro's angel Golden |
Supplies
You don't need a whole lot of stuff to get started. Just the following:
- Some foam to work on (because you'll be stabbing a very sharp needle into the wool)
- Special wool (called "roving")
- Special felting needles.

Also Band-aids. You'll need Band-aids. Cuz there will be blood (because you are stabbing a very sharp needle into wool, which is in a tiny ball that you're holding in place with your fingers).
That's pretty much it, except for some beads for eyes and a nose (although you could also make the eyes/nose from the wool).
We originally got all our supplies at some local knitting shops, but now get things online via Living Felt. We also originally ordered a book called "Wool Pets" off Amazon. There's good step-by-step info in here for 20 different animals, including a border collie. We started with the bunnies in the book. Bunnies are much easier than dogs - no long complicated legs!
These were the first things we ever felted. (My one sis ended up turning her bunny into a rat... And she never felted again...)
 |
| Three bunnies and a rat |

The Body
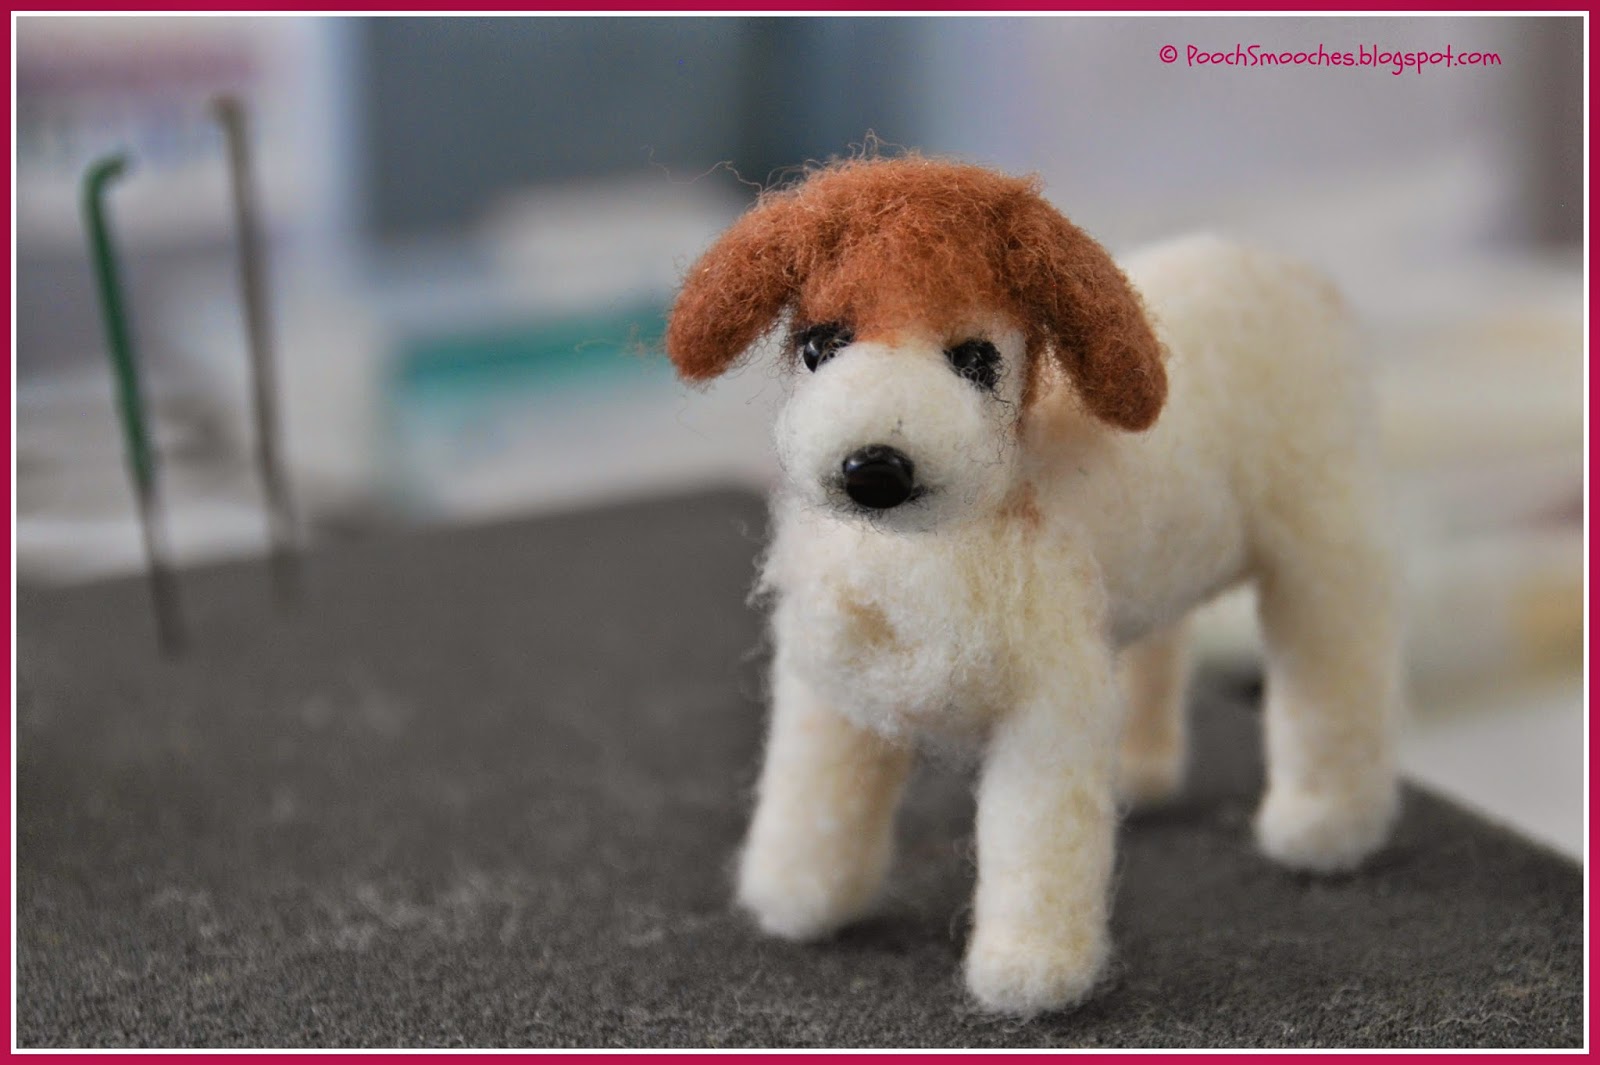
Today I'll demonstrate how to make a beagle - the little beagle on the top left, to be exact.

Start by tearing off (or cutting) a piece of wool about 6 X 3 inches.

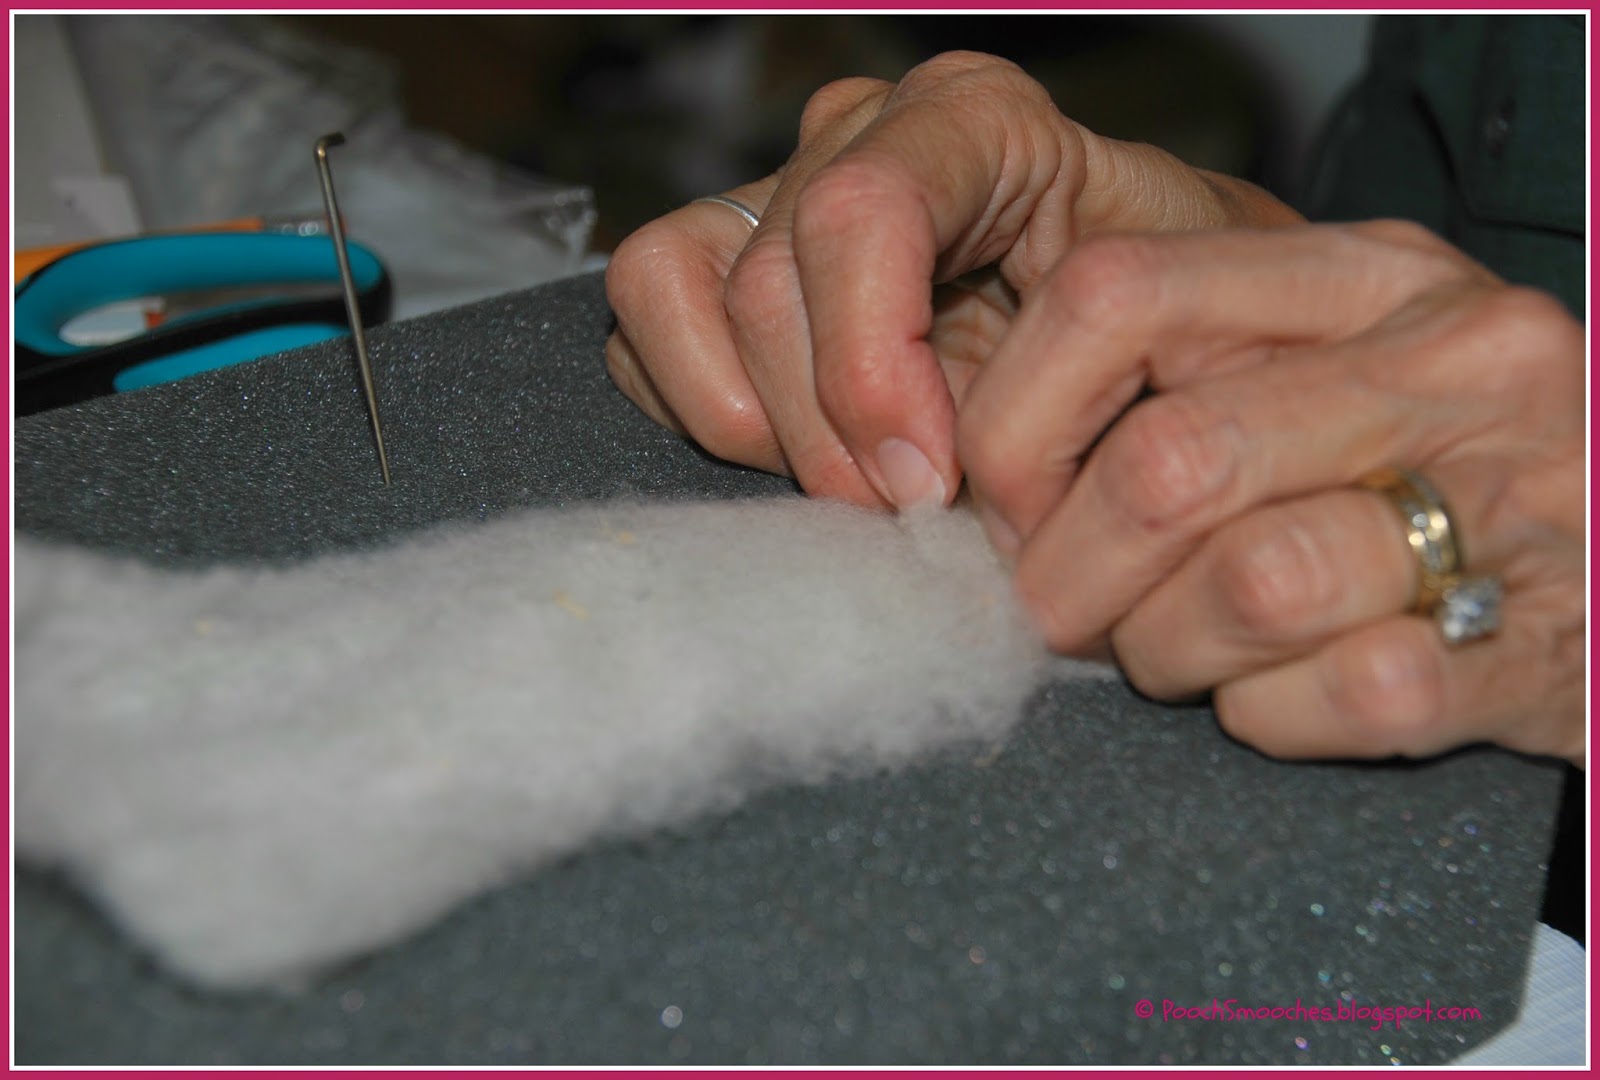
The needles are barbed, so as you stab, it makes the wool pull together. The more you stab it, the tighter it becomes (which is a good thing!). Be sure to stab it all over, including on the ends.
A small loop of wool, stabbed into place, forms the neck.
Legs
I'm not gonna lie... legs are hard. If you plan to felt a corgi, rejoice. If you want to felt a Great Dane... bummer. (I'd suggest having him be seated.)
For this beagle, I used a piece of wool that was about 2 x 1 1/2 inches for each of the back legs, and slightly smaller in length for each of the front. (I just rolled/stabbed these legs into shape, but for longer legged dogs, it can be helpful to roll the wool the long way around a thin skewer, then slip it off and start stabbing.)
Stab into one end to make the leg nice and "tight," but leave the other end loose (the haunch), where you'll attach it to the body.
Use the "fine" needle (it will be colored or #'d/labeled on the packaging) to do the detail work of adding the bend at the toes. Just repeatedly stab a little line across the foot, and it will start to take shape.

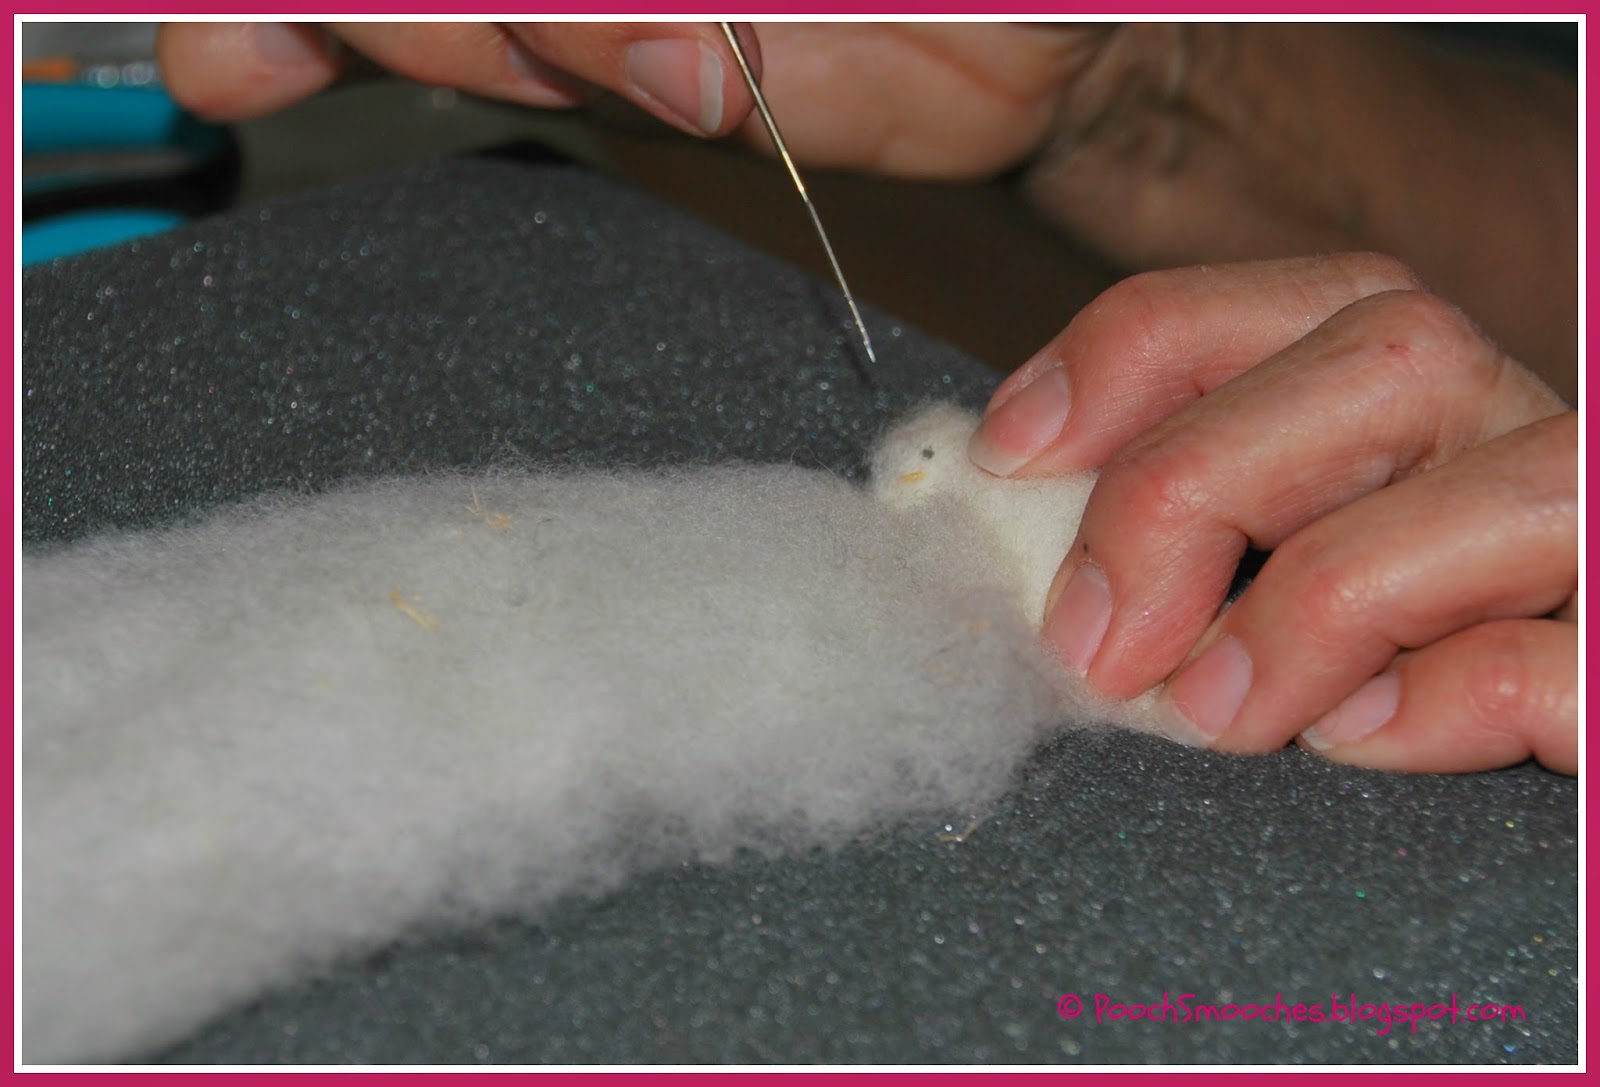
Head
I admit, I forgot to measure the piece of wool we used for the head. But this is all very forgiving... We usually just eyeball things. Try rolling, say, a 4X2 inch piece of wool into a cylinder - if it looks like it will be too fat/too long after needling it, just trim a bit off the width/length and start over.
Once you have the head needled into somewhat of a cone shape, use the fine needle to define the face. You can stab across the bridge of the nose to define the snout. Then stab eye holes in. (To later sew in a bead, or you can stab in eyes made of wool.)
If you are using beads, sew them in before attaching the head to the body. (So you can tie off the thread/hide the knot at the base of the head where it won't show.)

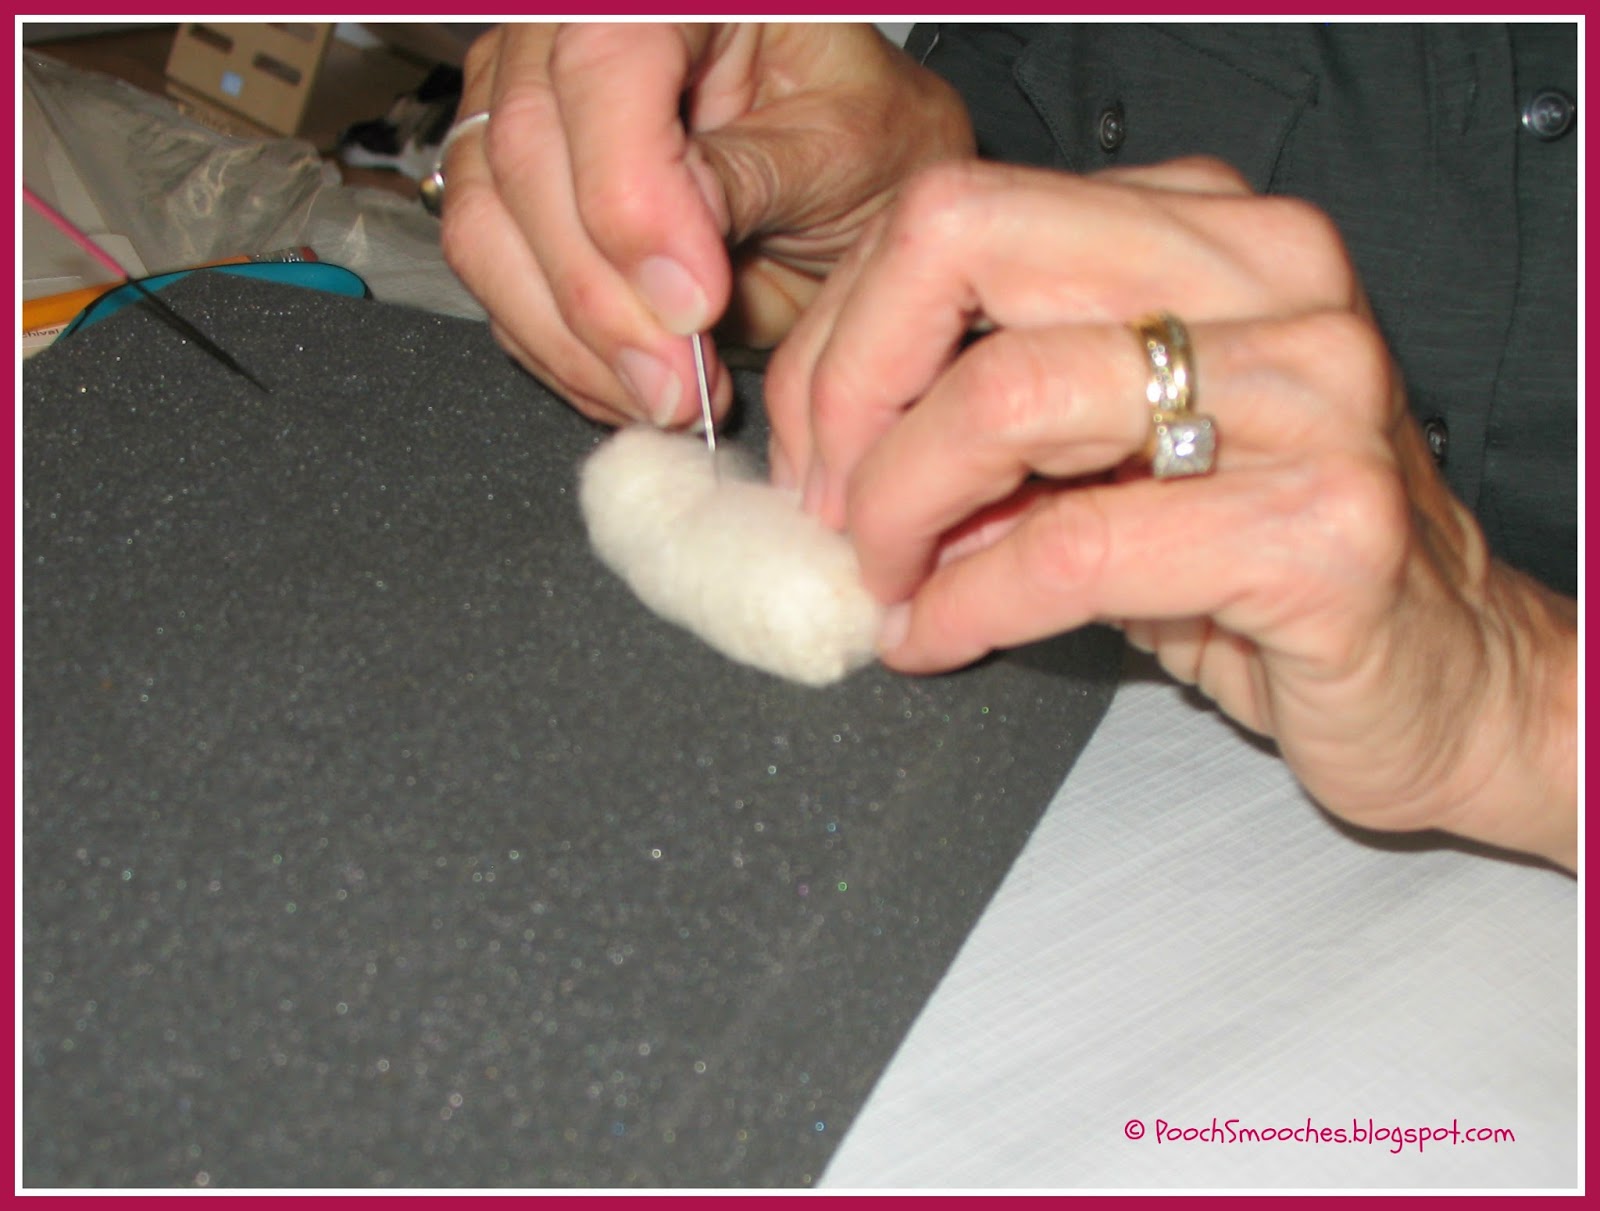
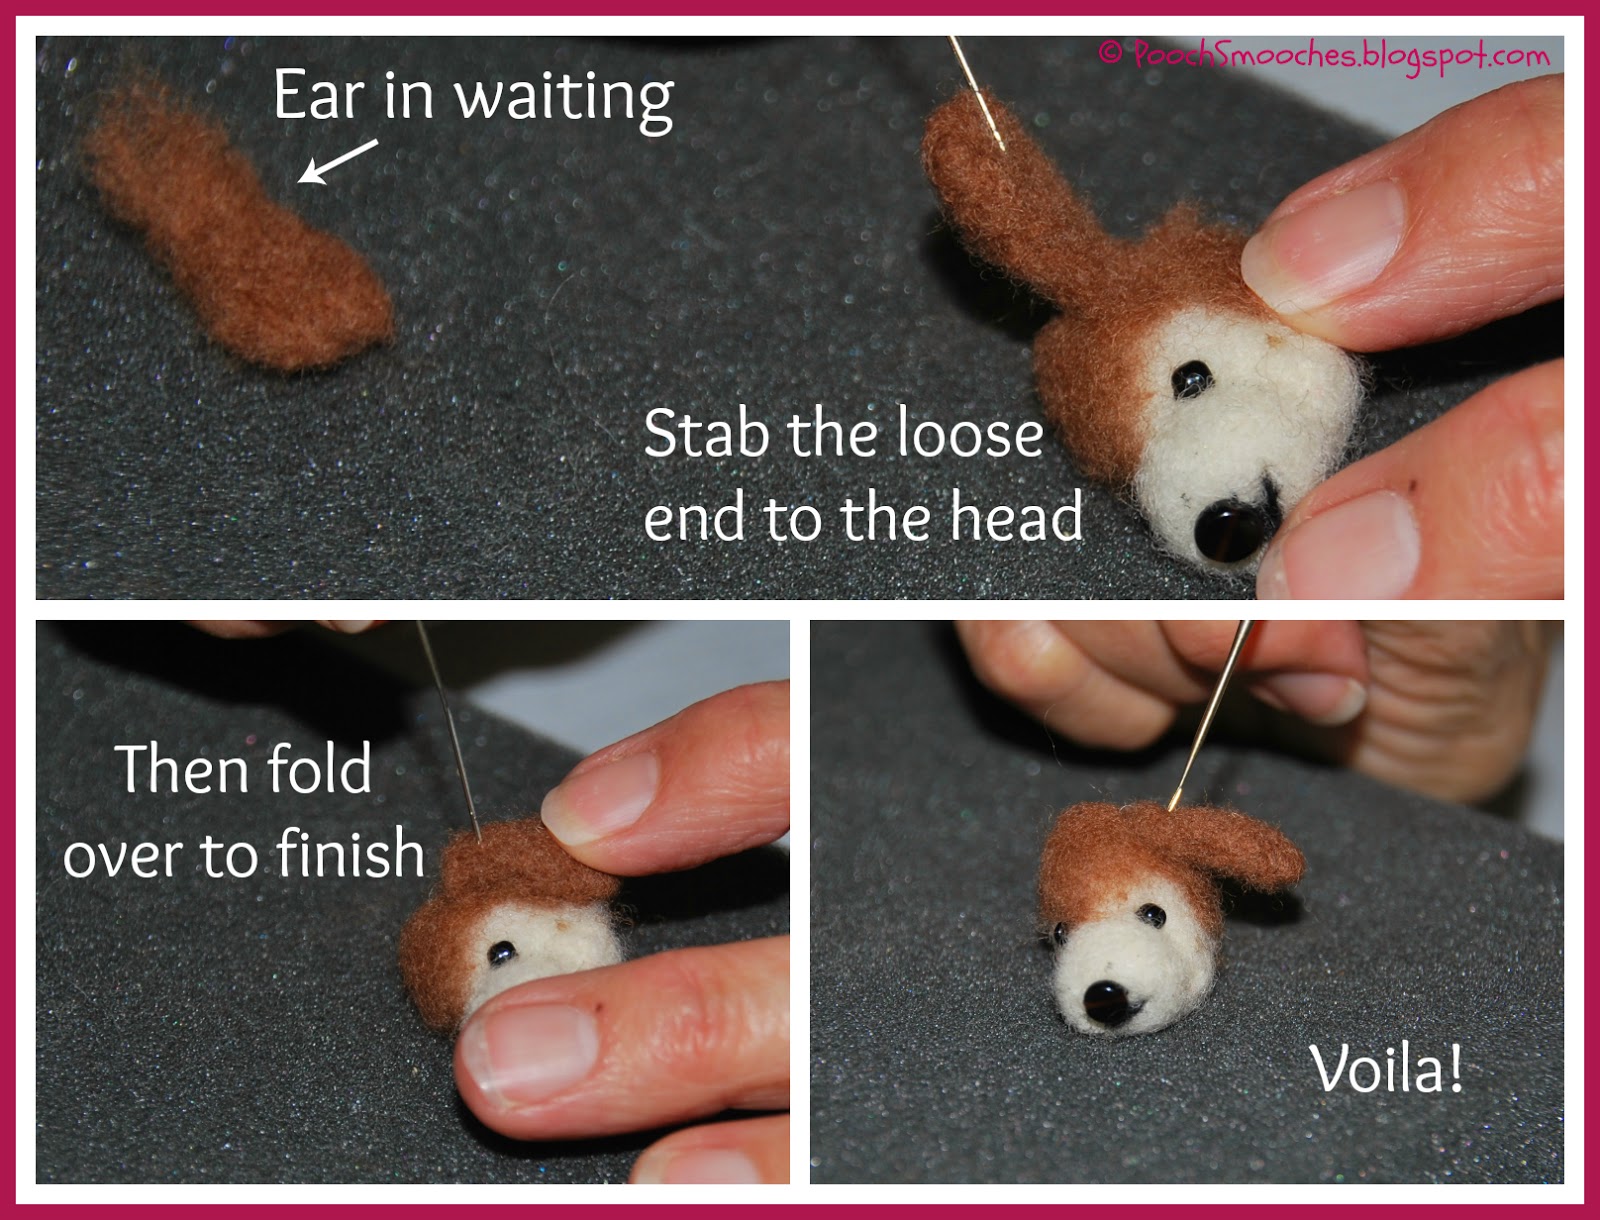
Ears
For the ears, take a small piece of wool (slightly longer than the final ear will be) and fold and needle it on your foam until you have the ear shape you want, either rounded (as for this beagle) or pointed (if that's what your dog has - note that this is harder!). Leave the other end loose for attaching. Lay the outer side of the ear along the head and stab it into place. Then fold it over and give it a few more stabs to hold the ear down.
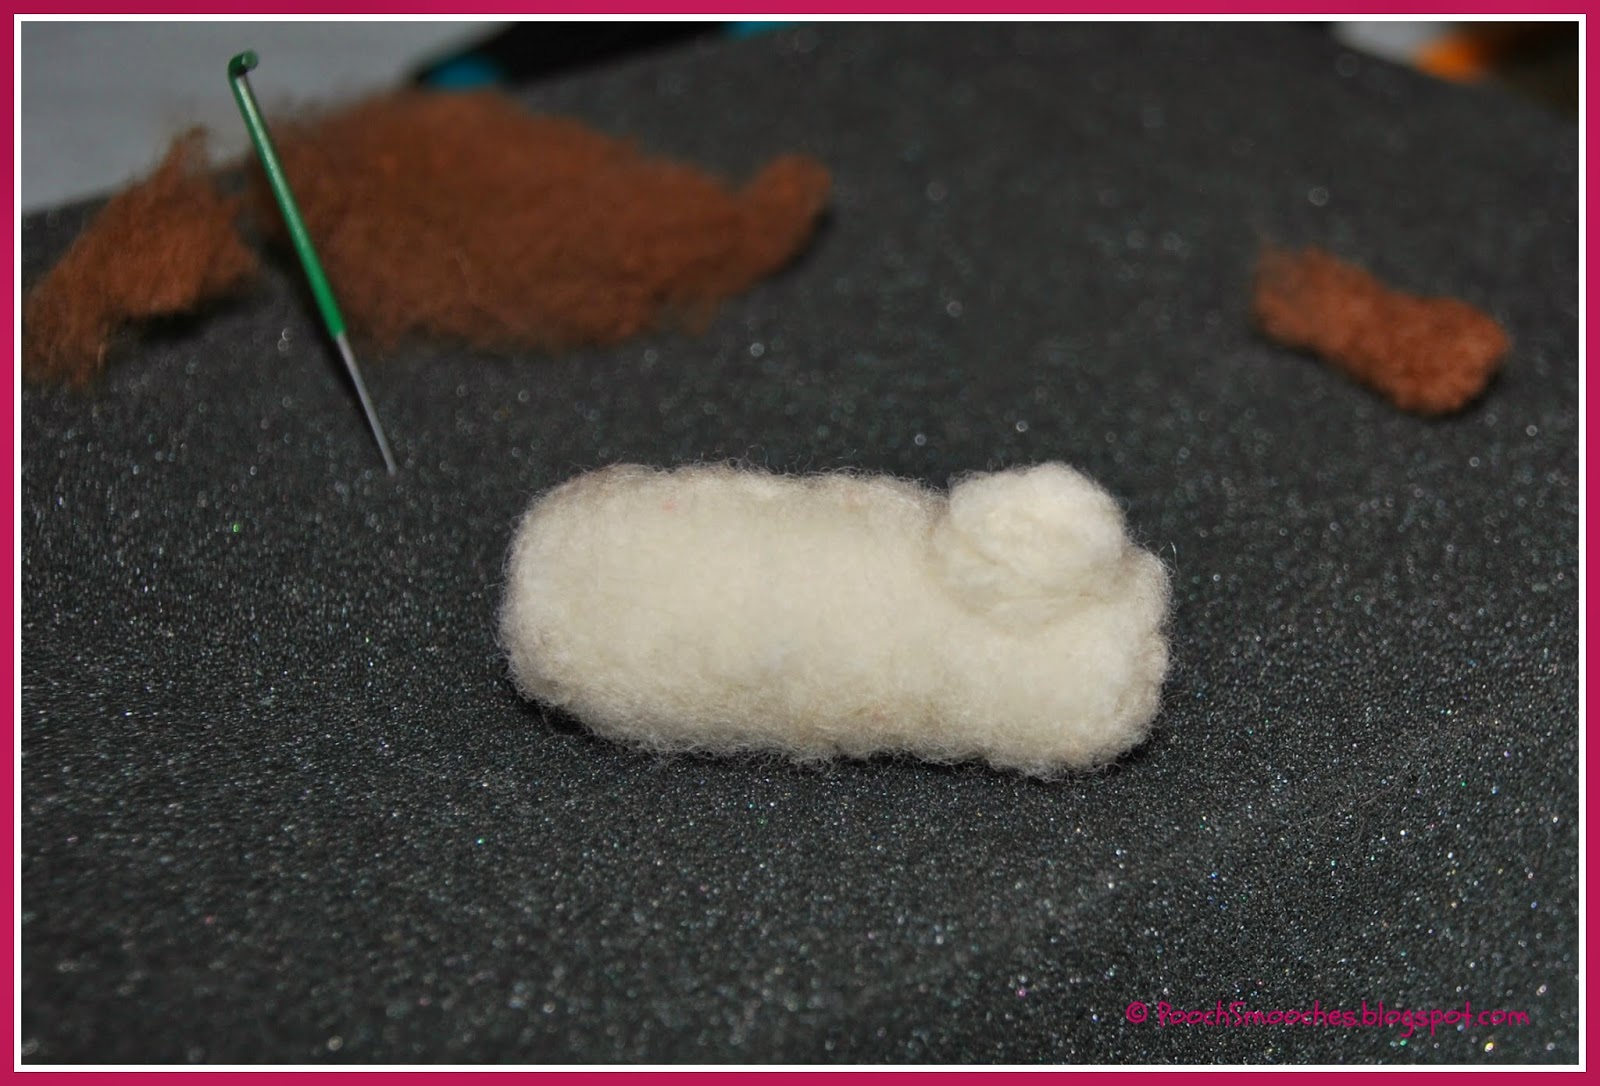
Forming the Dog
Attach all the body parts to the dog. Try to stab from all directions so the pieces come together well. (e.g. for the legs, stab mostly from the outside, but also up through the inner thigh.)

Ain't she cute?! But she's not done yet...
Finishing
If you can see a lot of needle marks (say, where you attached a leg), just get a small piece of wool and gently needle it over the areas you want to cover up. It's very forgiving. (This is where felting a fluffy dog is an advantage!) Of course, for a beagle, you don't have to worry about the attached parts showing, because you'll be covering the body with brown and black wool. Just lay a piece of wool over the body, trim it to the right size and gently stab it into place. (We did a full piece of brown first, then laid a black "saddle" over that.)
For the tail, I just made a small cylinder of white, put some black over it, and stabbed it into place using the same method as the ear to hide the loose end.

If using bead eyes, you can stab very wee bits of black wool around the eyes to look like eyelashes. Adding a ribbon for a collar and a tag makes a nice final touch!

It takes my sis and I working together about 2 to 3 hours to make a dog, depending on how complicated it is. Then it takes us an additional hour to squeal over how cute it is and take photos!
Hope this was helpful. If you attempt this, I'd LOVE to see your work. But... seriously, I suggest starting with something easy like a bunny. Or a rat.
Let me know if you have questions!
Thanks to BlogPaws for hosting Wordless Wednesday!

So if I generally cut myself several times when stabbing a potato to bake, I likely shouldn't attempt this project right? :)
ReplyDeleteHmm. Yes, might be dangerous. But I'm klutzy and I've only poked myself a few times. :)
DeleteI am so bad with the needle I have leather finger protectors as well as rubber and I have still stuck my fingers through them!! 8 still have 2 questions if possible, first the needles i have came with a kit and there was no way to distinguish the difference. I then bought a pack from Hobby Lobby and I don't remember seeing any sizes listed on them. Is there any other way to find the sizes? I have just been going with chance , using whichever works for the moment! Lol 2nd I love these instructions and can't wait to make the little beagle,Beagle, I am making q bunny at the moment, and I wondered if you have any tutorials on how to do the long hair or fluffy bunnies or Yorkies qnd pomeranian, etc. Thank you in advance and thank you for sharing your skills with everyone!
DeleteI'm thinking of taking a felting class later this summer. Will bring Band-aids.
ReplyDeleteOh, I can't wait to hear how your class is. I hope they don't say we're doing it all wrong!
DeleteThose are fabulous. We really think they are wonderful. We are not crafty and would not know even where to start.Have a wonderful Wednesday.
ReplyDeleteBest wishes Molly
Yeah, this is kinda a hard place to start if you don't have the crafting-gene!
DeleteVery interesting and crafty. I would never have imagined that is how it is done. Nice work.
ReplyDeleteIt's interesting, isn't it - that there's nothing really holding it all together. I was fascinated by it when I first saw some videos on YouTube about it.
DeleteI am about the least crafty person alive, so I'm going to pass. But this is too insanely cute, so I'm pinning it for others and their crafty selves. Thanks for sharing!
ReplyDeleteThanks for pinning. I need to pin it on my page. I always forget about my darn Pinterest account!
DeleteFantastic tutorial! One of these days I'm going to try this. Thank you!
ReplyDeleteYou should definitely try it! I bet you could make an awesome Jeffie! Fluffy dogs are easier to make I think - more forgiving! You can hide any mistakes with fluff!
DeleteThat is really very clever idea and the results are so cute. I'm afraid I would stab my eyes out with those needles though since I have no patience...
ReplyDeleteYou do need a bit of patience... and nimble fingers help too!
DeleteThose are so damn cute! If I wasn't up to my eyeballs in stuff to make, I would give that a try.
ReplyDeleteOooo, a felted Roxy or Torrey would be sooooo cute!
Deletethis is fascinating, Bet it takes a lot of patience to do but worth the effort. love them
ReplyDeletehugs
Mr Bailey, Hazel & Greta
Thank you! It's fun to do, especially since my sis and I make them together.
DeleteI was really hoping I could do this project with their excess fur.
ReplyDeleteHee. You could incorporate some of their hair - but you couldn't make them solely out of the hair - it needs to be something (like wool) that will "stick" together.
DeleteGreat tutorial. I would be inspired to try it but being of the klutz variety I am sure i would stab a major artery.
ReplyDeleteLuckily the needles are so fine that when you do poke yourself it doesn't bleed toooooo much. Hope I didn't scare off any folks who faint at the sight of blood!
DeleteThanks!
ReplyDeleteYour post title made me LOL! :) These are too cute - do you do custom orders? ;)
ReplyDeleteGlad you liked the title! :)
DeleteWe've never done a custom order - but we've made a lot of them as gifts. (Oh wait... I might have just lied... I think our other sis custom ordered one from us once, to give to her friend as a present. So, yeah... we did it once!)
Your instructions make it look pretty straight forward if you go into with the belief that the wool will stick together (the science of that elludes me!) However, these things are never as easy as a demo makes them look! When I get frustrated with something crafty, I rip it to shreds in a fit of anger. This has temper tantrum written all over it! LOL!
ReplyDeleteI think the science is the same as the science that worked on those bouffant hairdos gals wore in the 50s. (although no hairspray is involved to make the dogs' body parts stay in place!)
DeleteJust darling, Jackie! And inspiring!! Good luck for the blue ribbons!
ReplyDeleteWe had better get a blue ribbon or we are going to be HOT! ;)
DeleteWow! you got lots of Patience. They are too cute :-) I bet if you make a bigger one its much easier :-) Wishing you the best again ... we are sure you are going to WIN again. Golden Woofs
ReplyDeleteBigger ones though mean longer legs... and legs are hard! :) Thanks for the good wishes!
DeleteOh my dog! How cute! I always wondered how these masterpieces are created... you make it look so easy (albeit painful, lol) but I can absolutely tell it's not! Just gorgeous!
ReplyDeleteHugs, Carrie and Pups x
Thank you! It's really a fun thing to do once you get the hang of it, and learn not to stab yourself! :)
DeleteThey're so cute! I don't have a crafty bone in my body though....and I hate bleeding. :)
ReplyDeleteIt's not a LOT of bleeding. Just a little. Nothing a Band-aid can't handle. No Urgent Care trips would be needed! :)
DeleteSquealing...of course! These are absolutely adorable!!!
ReplyDeleteThank you! We squeal a lot while we work on them!
Deletevery very cool, thank you for the demo, I think I will just order mine from you as I will poke myself 1000 times.
ReplyDeleteYou learn not to poke yourself after the 500th time!
DeleteI have wanted one of these for several years! You make it look like something I could possibly do. Are you sure you wouldn't like to try practicing making a Greyhound and then letting me take it off your hands?
ReplyDeleteGreyhounds... long legs. See above re: legs! Probably won't attempt a grey anytime soon... Sorry! :)
DeleteThat's actually so cool! I tried to learn how to crochet once and failed miserably, so I don't think I should give needle felting a try, especially since I'm super accident prone. I wouldn't call your guys caricatures. They look GREAT!
ReplyDeleteAww, thanks!
DeleteThose are so cool! I wish I was crafty.
ReplyDeleteIn our family you are forced to craft, whether you are crafty or not...
DeleteLOVE the beagles! Definitely want to try this out soon.
ReplyDeleteBeagles are fun to make!
DeleteWow, those are amazing! Mom can sew, but this kind of thing requires too much patience I think. So very cute!
ReplyDeleteOh, I'm not a very patient person, so I don't know about needing patience. Mostly you need nimble fingers!
DeleteWOAH. That's incredible! I'm so seriously impressed!
ReplyDeleteThank you!
DeleteI just don't think I could do it. It's amazing, I can't believe there's not really sewing involved!
ReplyDeleteI know - when I first saw it done on a YouTube video I was amazed too. So wild how the wool just sticks together.
DeleteI am fascinated by this. Everything. How on earth did someone figure all this out in the first place? It's amazing when you think about it. Also, I lover EVERYTHING about fiber art, especially felting, but I have no patience for tedious needlework; I can't even sew a button without a bloody mess. Really! SO impressive, Jackie! Love it!
ReplyDeleteThanks! Good point - who did figure out this was even possible!?
Deletehello pooch smooches its dennis the vizsla dog hay yoo lost dada at needels!!! i do not think he wil come owt frum under the taybel for a week!!! ha ha ok bye
ReplyDeleteYes, not a good past time for folks who don't like needles!
DeleteWow, great job with these! Those dogs are so cute! Honestly, this is something I would never attempt. I'm just not crafty, but seeing how you did this makes me appreciate your talents. Great pictures of them, too!
ReplyDeleteThanks! I had a hard time getting good pics. My camera's great for long distance shots, but not for macro stuff!
DeleteOr...just pay someone else to do it for me. Voila! No band-aids needed. ;)
ReplyDeleteThis looks like a cool project but I stab myself just sewing on buttons so I'm thinking my hands would look like hamburger if I attempted this.
In my family we come from a line of folks who will try the DIY route before paying someone else! You'd be surprised how quickly you learn to keep your fingers out of the way!
DeleteOh my gosh, I'm just learning how to felt so coming across this is fabulous! You're absolutely right though, you WILL stab yourself! Thanks for the tutorial, excellent job and an adorable felted pup. ღ
ReplyDeleteOh, that's cool that you're learning to felt too! We haven't done it in a while!
DeleteI'd love to see what you make!
If anything turns out decent, I'll share, otherwise, it'll go straight into the failed crafts bin. 😄
Delete